

UPDATE: May 22 2020. Pinterest has finally released a Shopify app for select countries, you can find it here. their own guide on how to setup the Pinterest tracking tag on Shopify. You can view that HERE. Our method below will still work fine, and is just more detailed vs their guide. The method below also includes enhanced matching which the Pinterest guide does not.
This guide will walk you through how to set up the Pinterest conversion tracking pixel on your Shopify store with or without enhanced matching.
Before you start, you should create a backup of your theme.
Part 1: Install Base Code
The first step is to place your base conversion tag code into your Shopify theme.
1.) Copy your base code, or copy and paste the snippet below
<!-- Pinterest Pixel Base Code -->
<script type="text/javascript">
!function(e){if(!window.pintrk){window.pintrk=function(){window.pintrk.queue.push(
Array.prototype.slice.call(arguments))};var
n=window.pintrk;n.queue=[],n.version="3.0";var
t=document.createElement("script");t.async=!0,t.src=e;var
r=document.getElementsByTagName("script")[0];r.parentNode.insertBefore(t,r)}}("https://s.pinimg.com/ct/core.js");
pintrk('load', 'YOUR_TAG_ID');
pintrk('page');
</script>
<noscript>
<img height="1" width="1" style="display:none;" alt="" src="https://ct.pinterest.com/v3/?tid=YOUR_TAG_ID&noscript=1" />
</noscript>
<!-- End Pinterest Pixel Base Code -->
Make sure you place your Tag ID in the two spots indicated above with YOUR_TAG_ID.
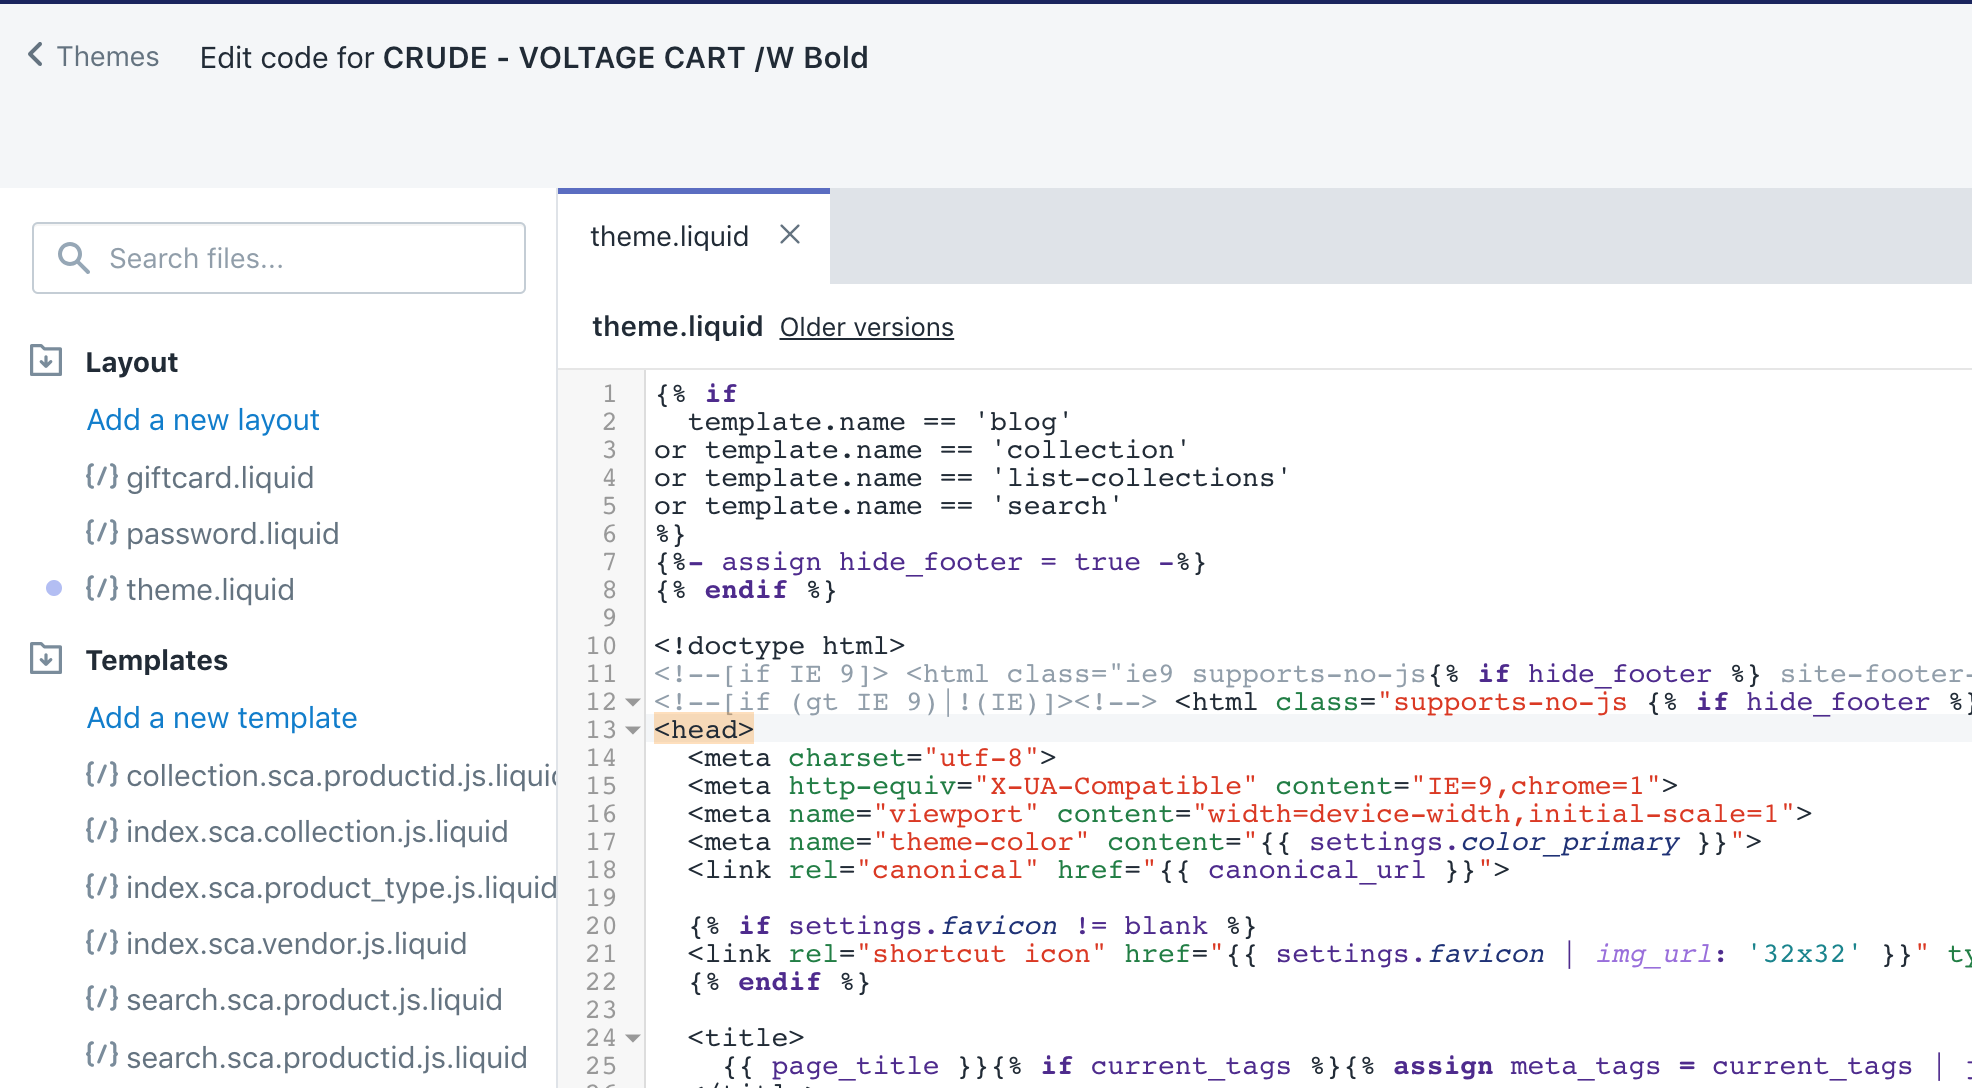
2.) From your Shopify dashboard navigate to Online Store > Themes and select Actions > Edit Code.

3.) From the left sidebar select the theme.liquid file.
4.) You want to place this code before the closing </head> tag. You should see <head> near the top of the theme, if you click on it, it should highlight it. Scroll down and the closing </head> should be highlighted or search for </head>.
5.) Once you locate the </head> tag paste the code from the last step above it. Make sure you replace YOUR_TAG_ID with your Pinterest Tag ID if you have not already done so.
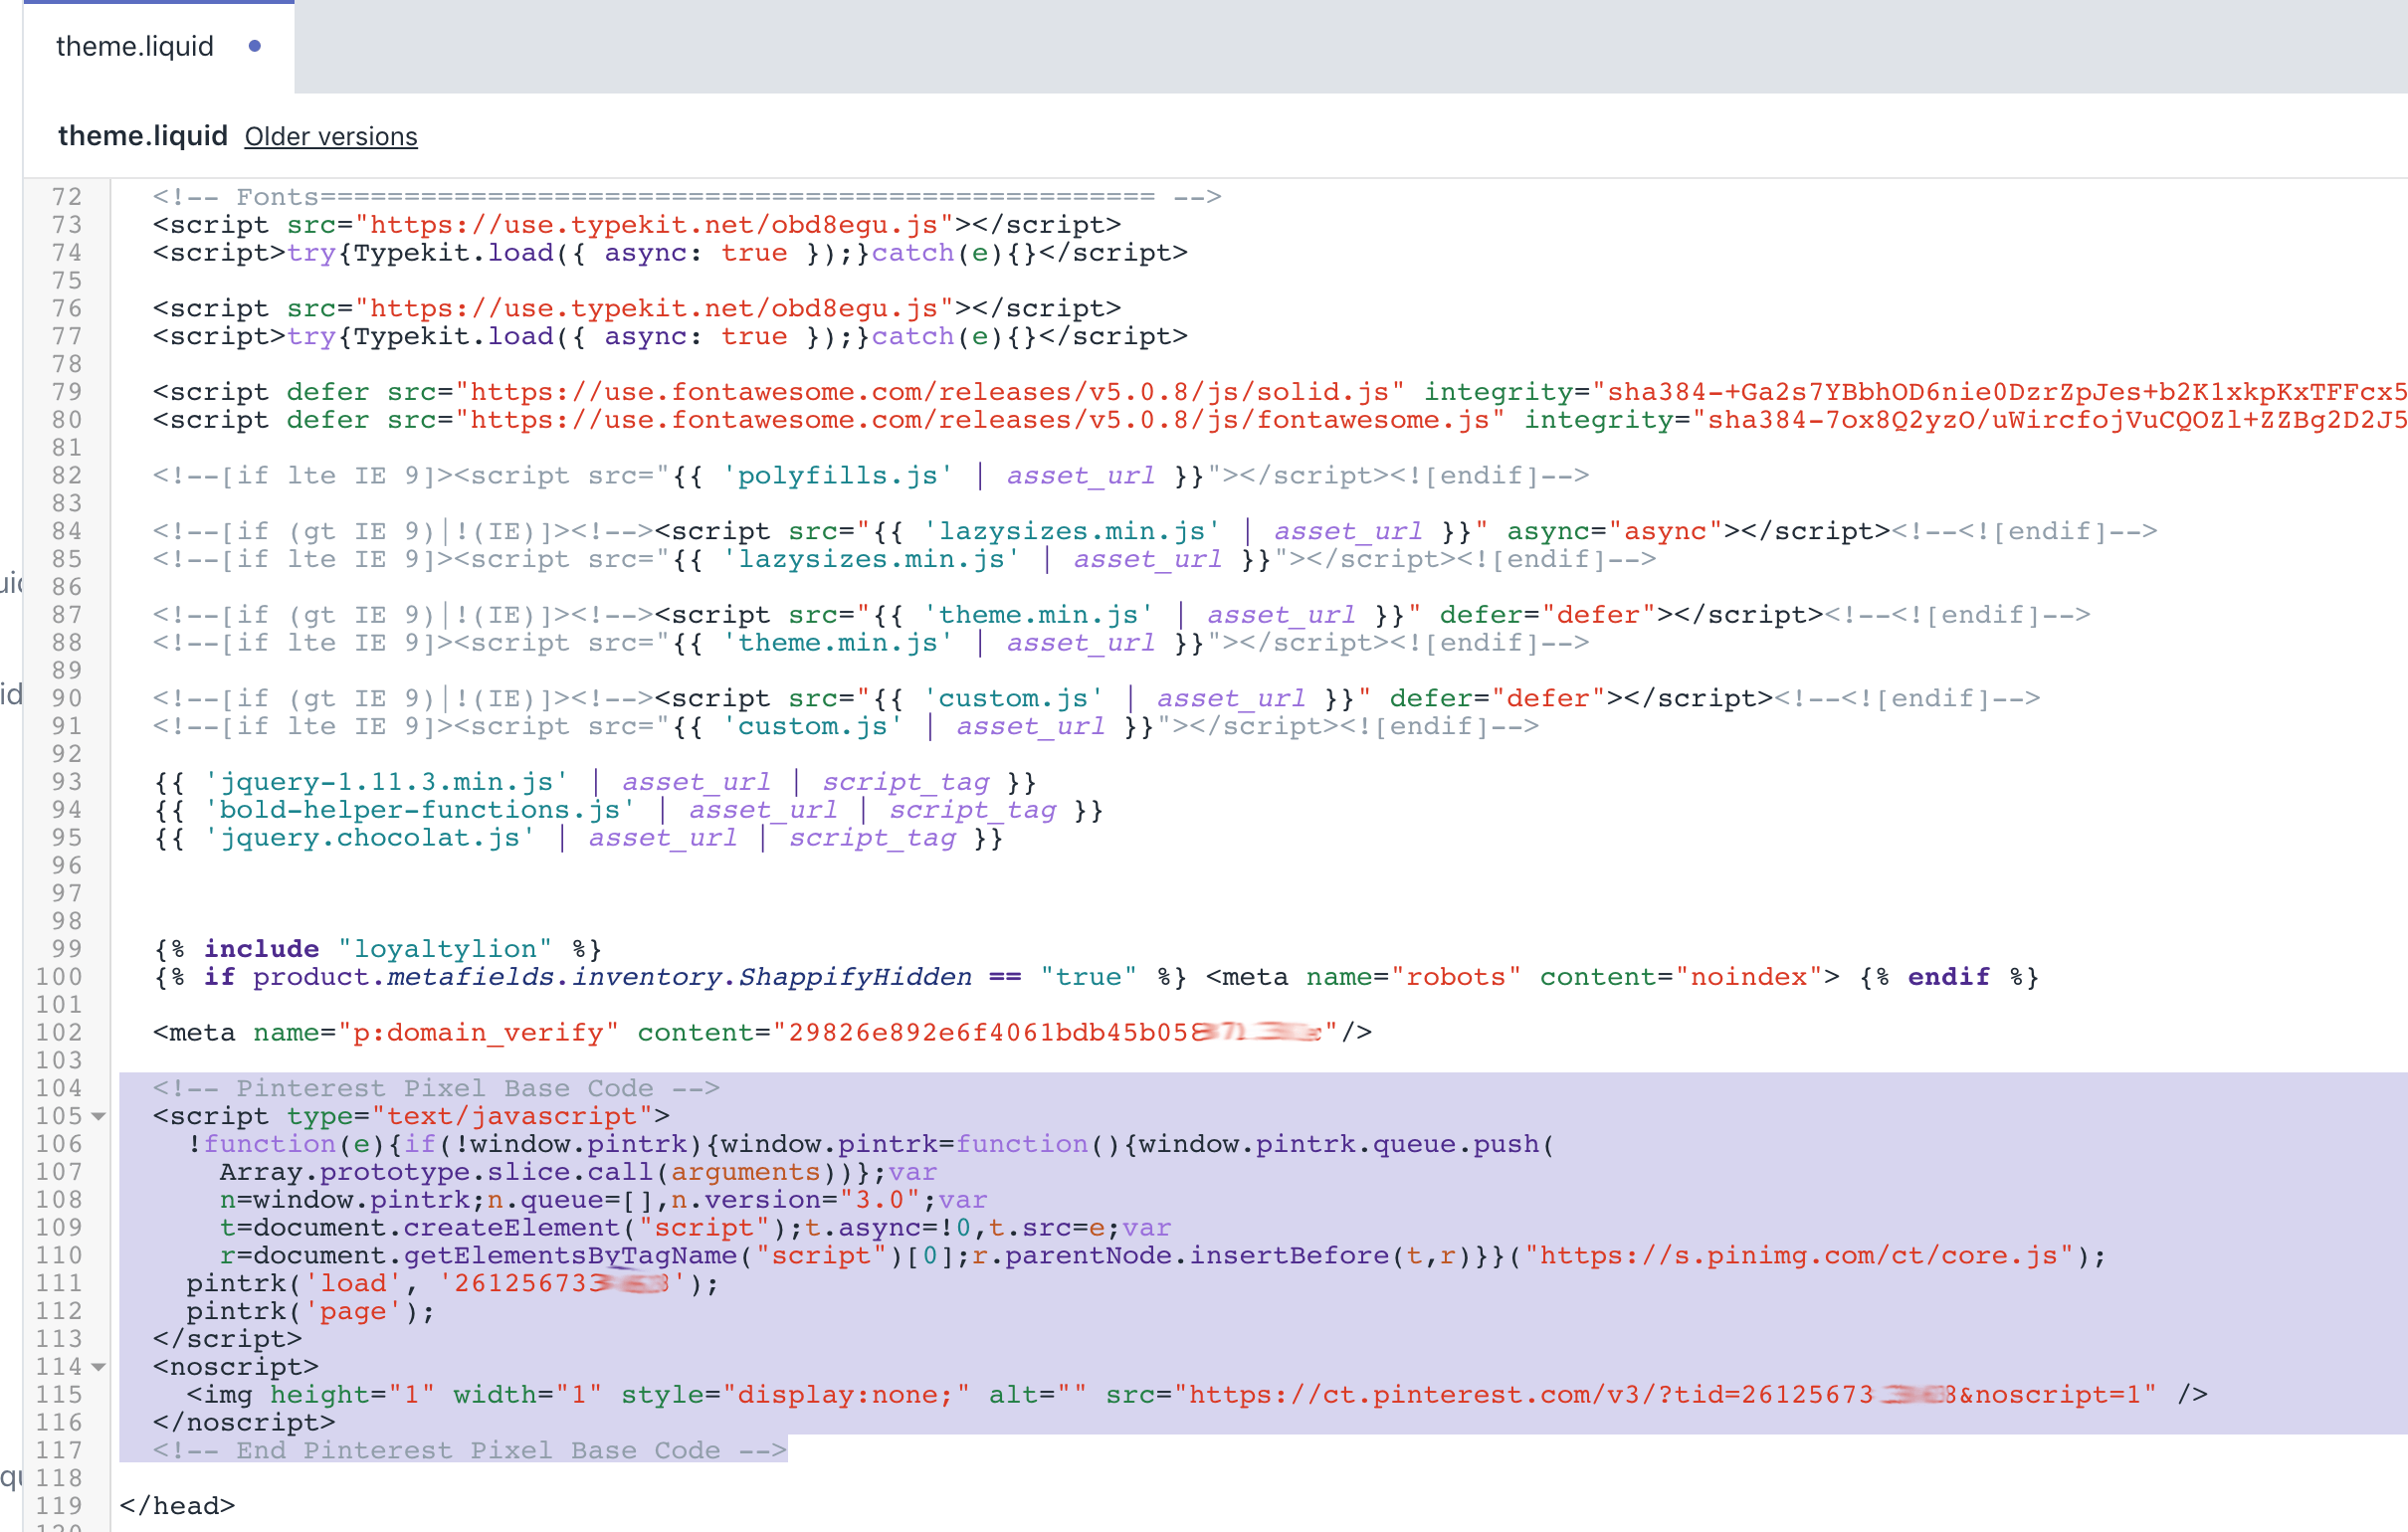
6.) Save changes by clicking the button in the top right corner.
Note: If you have not already claimed your Shopify store on Pinterest you will have to add the meta tag which looks like this:
- <meta name="p:domain_verify" content="29826e892e6f4061bdb45b05871888ec"/>
Part 2: Install Conversion Checkout Code
In this step, we want to collect conversion data from your customer’s purchases. So we will be using dynamic snippets from Shopify to pass the order value, the number of items purchased and currency. Currently, these are the only values that are collected by Pinterest, as well we can optionally setup enhanced matching.
1.) From your Shopify dashboard go to Settings > Checkout and scroll down to Additional Scripts.

2.) Paste the base code from Part 1 above into the Additional Scripts section. Again make sure your tag ID is filled in the two places that have YOUR_TAG_ID. Here it is again in case you need it:
<!-- Pinterest Pixel Base Code -->
<script type="text/javascript">
!function(e){if(!window.pintrk){window.pintrk=function(){window.pintrk.queue.push(
Array.prototype.slice.call(arguments))};var
n=window.pintrk;n.queue=[],n.version="3.0";var
t=document.createElement("script");t.async=!0,t.src=e;var
r=document.getElementsByTagName("script")[0];r.parentNode.insertBefore(t,r)}}("https://s.pinimg.com/ct/core.js");
pintrk('load', 'YOUR_TAG_ID');
pintrk('page');
</script>
<noscript>
<img height="1" width="1" style="display:none;" alt="" src="https://ct.pinterest.com/v3/?tid=YOUR_TAG_ID&noscript=1" />
</noscript>
<!-- End Pinterest Pixel Base Code -->
3.) Now we want to add the conversion tracking values. Copy and paste the following code below the end of the base code you just added:
<!-- Pinterest Conversion Code -->
{% if first_time_accessed %}
<script>
pintrk ('track', 'checkout', {
'value':'{{ total_price | money_without_currency }}',
'currency':'{{ shop.currency }}',
'order_quantity': '{{ item_count }}'
});
</script>
<noscript>
<img height="1" width="1" style="display:none;" alt=""
src="https://ct.pinterest.com/v3/?tid=YOUR_TAG_ID&event=checkout&noscript=1" />
</noscript>
{% endif %}
<!-- End Pinterest Conversion Code -->
This will track the total value of the purchase, your shop’s currency and order quantity which are the total items purchased on a per order basis. If you do not want Enhanced Matching you are done!
4.) Optional – Enhanced Matching. If you want to enable enhanced matching, we will need to do a small tweak to the base code you placed in the Additional Scripts section. Look for the line of code in the snippet that looks like this pintrk('load', 'YOUR_TAG_ID'); and replace it with pintrk('load', 'YOUR_TAG_ID', { em: '{{ customer.email }}', });
With Enhanced Matching your entire checkout script for Pinterest should look like the following. Feel free to copy this entire snippet and paste it in your Additional Scripts if you want Enhanced Matching. It includes all three of the steps above, just make sure you place in your Pinterest Tag ID in all three places so it can track your conversions from Shopify:
<!-- Pinterest Conversion Code with Enhanced Matching -->
{% if first_time_accessed %}
<script type="text/javascript">
!function(e){if(!window.pintrk){window.pintrk=function(){window.pintrk.queue.push(
Array.prototype.slice.call(arguments))};var
n=window.pintrk;n.queue=[],n.version="3.0";var
t=document.createElement("script");t.async=!0,t.src=e;var
r=document.getElementsByTagName("script")[0];r.parentNode.insertBefore(t,r)}}("https://s.pinimg.com/ct/core.js");
pintrk('load', 'YOUR_TAG_ID', { em: '{{ customer.email }}', });
pintrk('page');
</script>
<noscript>
<img height="1" width="1" style="display:none;" alt="" src="https://ct.pinterest.com/v3/?tid=YOUR_TAG_ID&noscript=1" />
</noscript>
<script>
pintrk ('track', 'checkout', {
'value':'{{ total_price | money_without_currency }}',
'currency':'{{ shop.currency }}',
'order_quantity': '{{ item_count }}'
});
</script>
<noscript>
<img height="1" width="1" style="display:none;" alt=""
src="https://ct.pinterest.com/v3/?tid=YOUR_TAG_ID&event=checkout&noscript=1" />
</noscript>
{% endif %}
<!-- End Pinterest Conversion Code with Enhanced Matching -->
Part 3: Testing
1.) Once you have completed the above, I suggest testing to make sure your Pinterest Pixel is tracking correctly. You will need to use Google Chrome for this step. Install the Pinterest Tag Helper chrome extension.
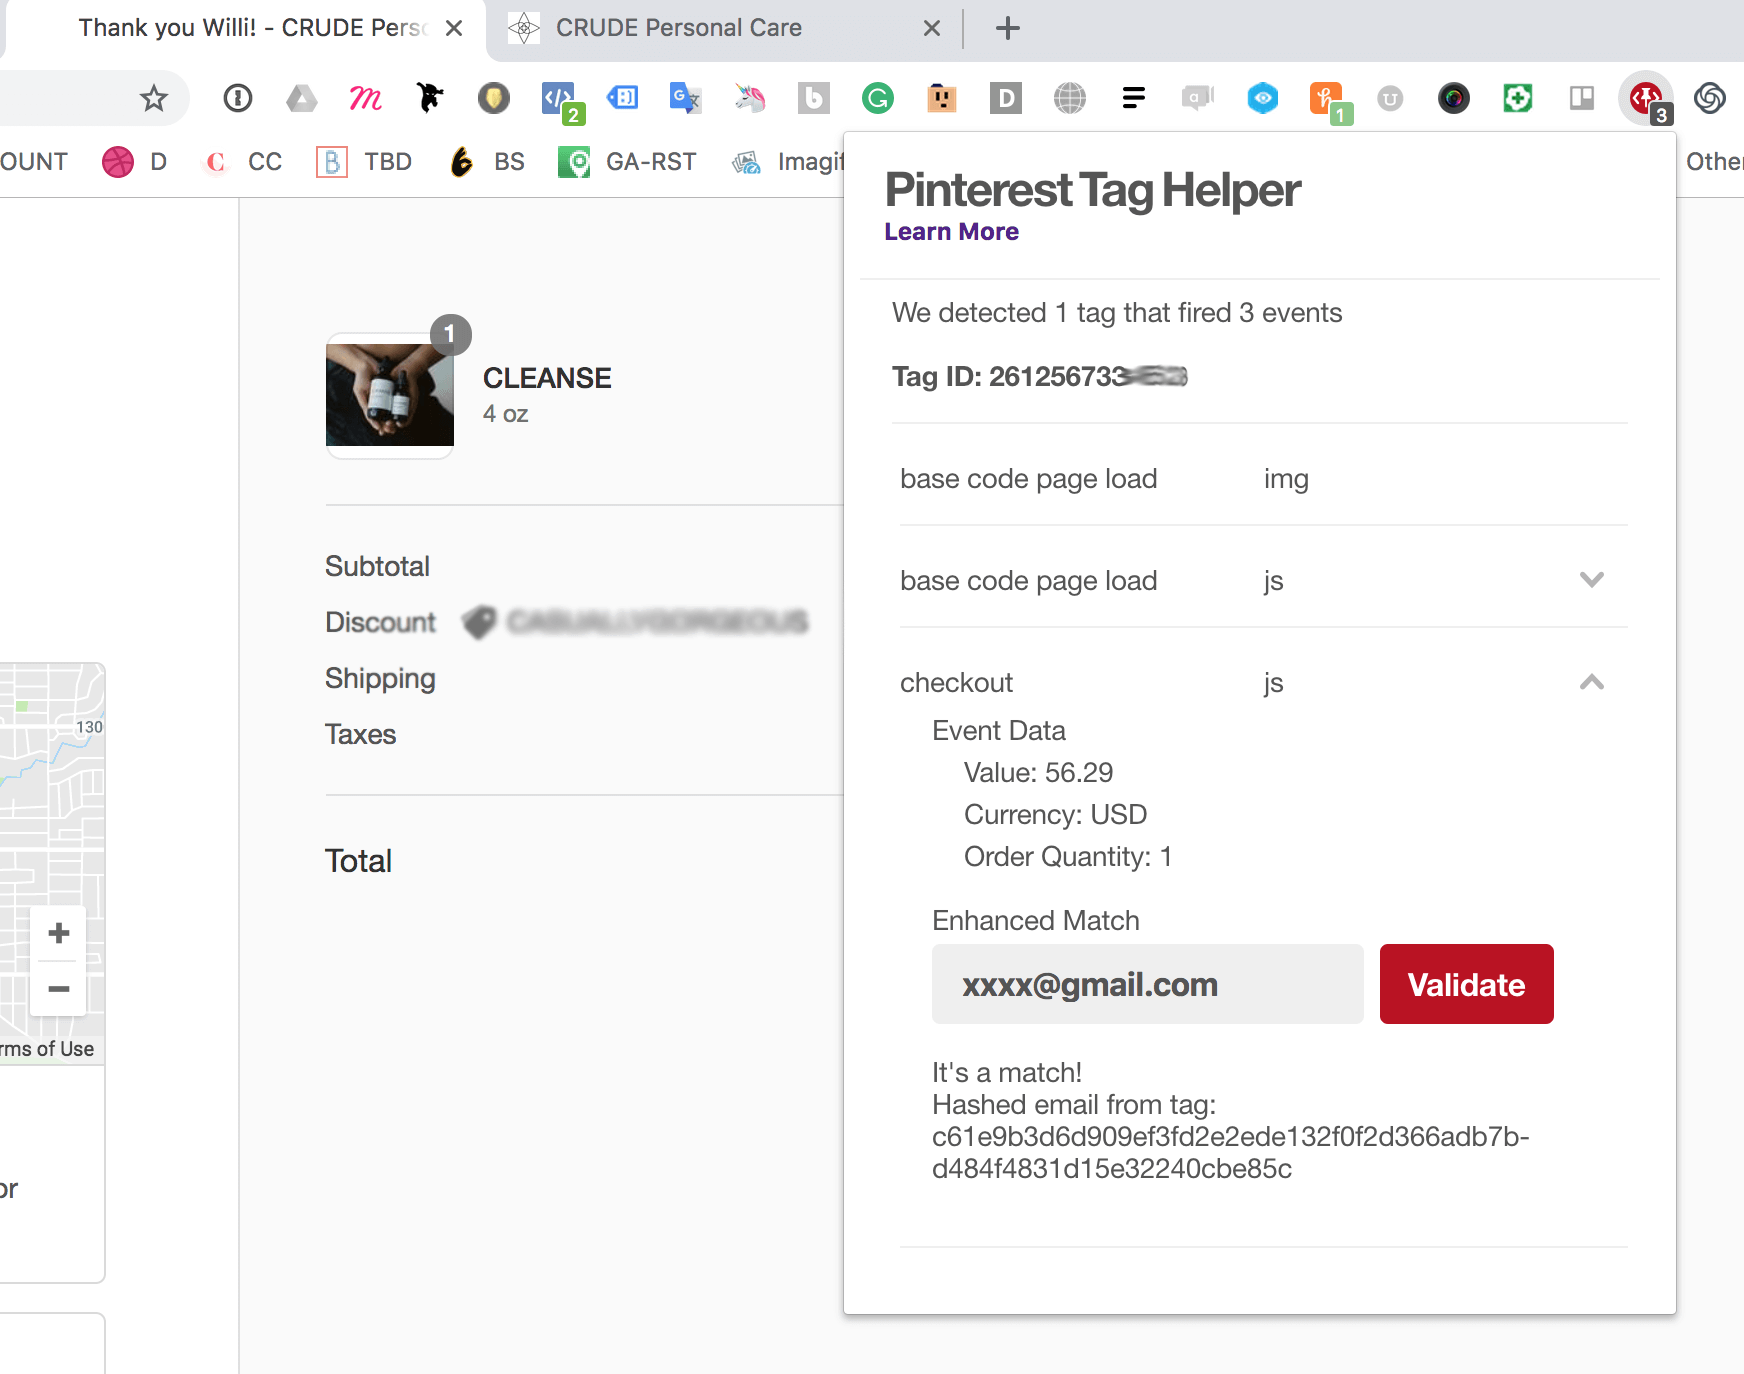
2.) First, let’s test the base pixel. Navigate to the homepage of your Shopify store, and click the Pinterest tag helper extension in your Chrome toolbar. You should see something like the following that states its working. Note it has detected my base code tag which ensures its working correctly.

3.) Now, let’s test the conversion pixel. We should be gathering the purchase data mentioned above, as well as email for enhanced matching if you used that version of the tracking code. Go to any order from your Shopify dashboard and view the order status page, then click the Pinterest tag helper extension. If everything is working you should see Value, Currency and Order Quantity being passed under the checkout toggle. If you want to test Enhanced matching, copy and paste your customer’s email address in the box and click the Validate button. This is how it should look if everything is working correctly.
That’s it! If you have any questions feel free to comment below.
Part 4: Optional – Track Add To Cart Actions
If you would like to track add to carts we can do that as well. This is a little more advanced. You can also repeat this process for other events like search, lead etc.
The code we want to pass is the AddToCart Pinterest Pixel event which looks like this:
- <script>
- pintrk('track', 'addtocart');
- </script>
We want this code to pass the value as well, so our modified version for Shopify is this:
- <script>
- pintrk('track', 'addtocart', {
- value: '{{ product.price | money_without_currency }}',
- currency: '{{ shop.currency }}',
- order_quantity: 1,
- line_items: [
- {
- product_id: {{product.id}},
- product_category: '{{collection.title}}'
- }
- ]
- });
- </script>
We only want this to fire when the add to cart button is clicked on a product page, so in order to control this, we need to add a little jQuery. This is the final code snippet:
- <script>
- function atcPin(){
- pintrk('track', 'addtocart', {
- value: '{{ product.price | money_without_currency }}',
- currency: '{{ shop.currency }}',
- order_quantity: 1,
- line_items: [
- {
- product_id: {{product.id}},
- product_category: '{{collection.title}}'
- }
- ]
- });
- }
- </script>
1) Go back to edit your theme as described in Part 1. This time browse to your product-template.liquid (this will vary per theme). You want to find your product form, which submits the data when someone adds an item to cart. So search this file for: <form, you should see something that looks like this: <form class="product-form" action="/cart/add" data-productid="{{product.id}} if you do not see these chances are your theme has a product-form.liquid file. If it does it will be in this file.
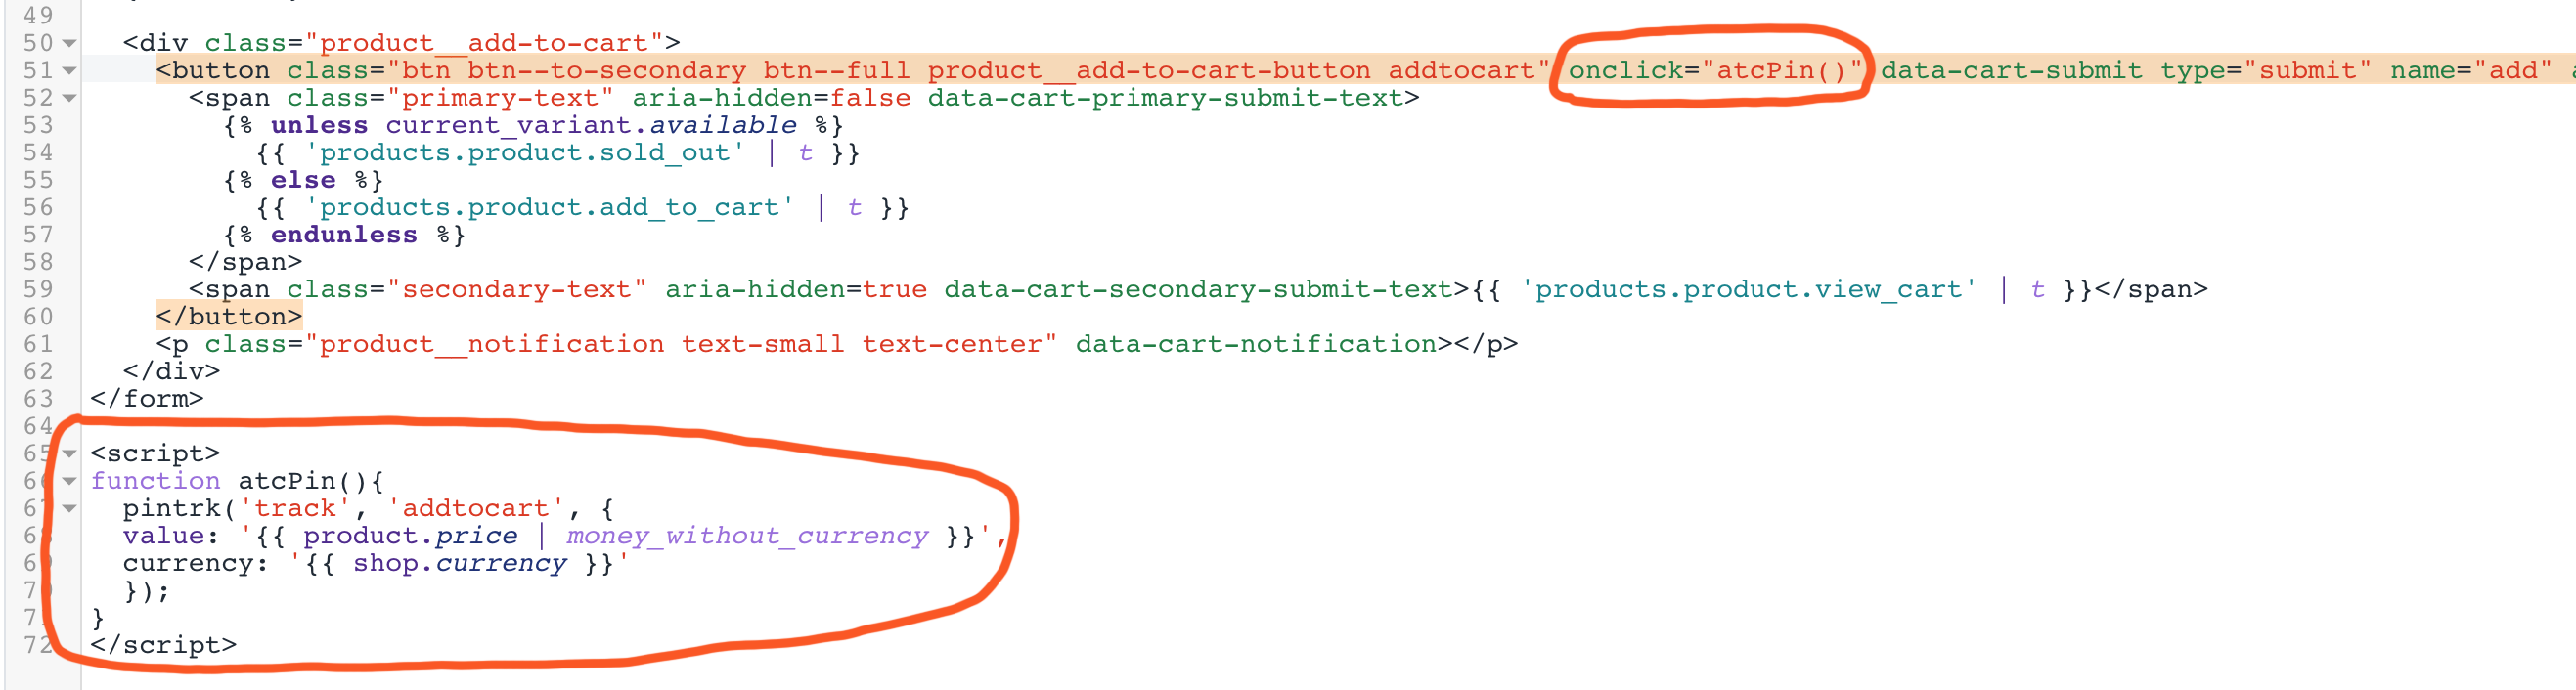
2) Within your product form look for your add to cart button, and after the button class insert onclick="atcPin()" then at the very bottom of the file (either product-template.liquid or product-form.liquid) add the code from above:
- <script>
- function atcPin(){
- pintrk('track', 'addtocart', {
- value: '{{ product.price | money_without_currency }}',
- currency: '{{ shop.currency }}',
- order_quantity: 1,
- line_items: [
- {
- product_id: {{product.id}},
- product_category: '{{collection.title}}'
- }
- ]
- });
- }
- </script>
3) The final outcome should look something like this:
Again you should be able to test this with the Pinterest Tag Helper when you add an item to your cart the number should increase. If you are using a cart drawer or modal you will have the chance to look and inspect the add to cart action. Important: Keep in mind this will only track the add to cart action and product price, not how many items are added to the cart. Meaning if someone adds a quantity of 2, the value passed will be the price of 1 item. If you do not want the value to be past and possibly skewing your results I suggest removing the value line in the above code.
Stuck? If you would like Voltage to set up your Pinterest Conversion Tracking Pixel for you, please contact us for more information.
Leave a comment
This site is protected by hCaptcha and the hCaptcha Privacy Policy and Terms of Service apply.